As most of you know I'm pretty active on CCFan and as such have made some pretty close friends from that site. My full time permanent ski partner is from that site and he's even been converted from a six time CC owner to an American Skier owner which he does love immensely.
The CCFan community is considerably larger than what we have here. The shear number of boats produced over the years compared to our boats is pretty much the reason. We have had many visitors over the years from that site to ski with us and I've participated in several CC reunions (with my American Skier) who have welcomed me with open arms.
Over the last few years in the February or March timeframes we've had a couple of these CCfan guys join us for a weekend of water time that has been affectionately dubbed the Wrecking Crew. Kind of a mini CCFan reunion that uses American Skiers for the weekend....LOL. So much for a breif synopsis of where I'm coming from and why you'll see me referencing Correct Crafts throughout this thread. I do it for a comparison between the construction practices used by each company. I also posted this on the CCFan site so the reason that I reference them frequently.
Last March was Wrecking Crew 2 and we had five skiers total with my ski partners (John) boat (an '86 Volante Barefoot Skier) and my boat (an '86 Advance Barefoot Skier) to make things a bit more comfortable. We were skiing the upper chain of lakes near the World Barefoot Center when Ben Groen came out with a couple barefoot clients to ask how long we would be. We had pretty much just started our set so we would be a while. He was more than understanding and was willing to go elsewhere but I told Ben that we would move to give them the water. They make a living doing this after all and I was sure that we could find more water on another lake. So John finished up a set in my boat with Adam (CCFan) and another local ski buddy Rob at the helm. Hollywood (CCFan) and I took Johns boat through a canal to another lake to find another spot. We had the boom and extended pylon on and the canal had a bridge that we had to pass under. The water has been pretty high this year so we took the boom and pylon off before going under the bridge. You can see where this is going, right?

I don't know why but I just had this weird feeling that something was "off". Three experienced boaters, a bridge...high water...social chatter...you get the drift?
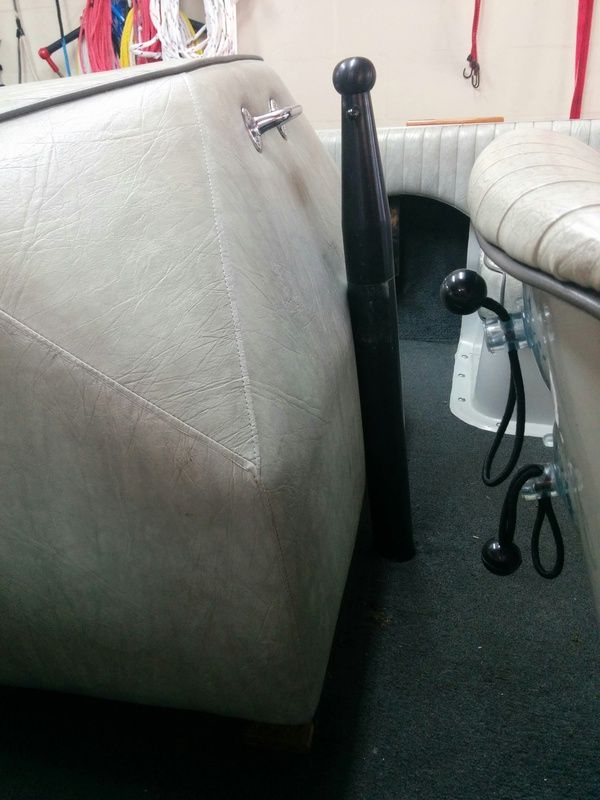
HW and I sat on the other side of the bridge after we passed under it to make sure that the guys took all the “stuff” off my boat before coming through the canal. Anyway, they came up and stop short of the canal and I see someone crawling out on the deck to start removing “stuff”. No problem, right? So HW and I continue on through the canal and wait for them. As I see the nose of my boat coming under the bridge, I see John standing next to the extended pylon holding onto it giving his best impression of “Show us your Captain” while being the chatty Cathy social butterfly that we all know and love so well. Turns out they took the boom off but not the extended pylon.
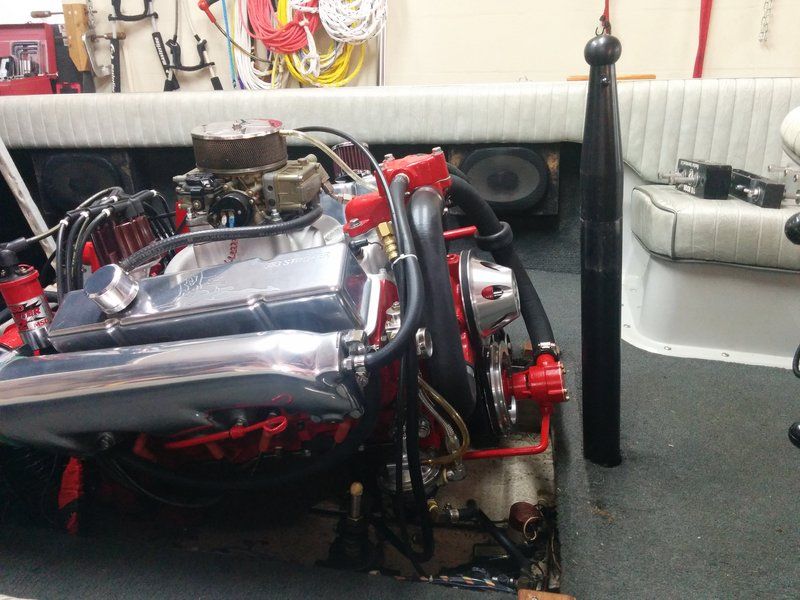
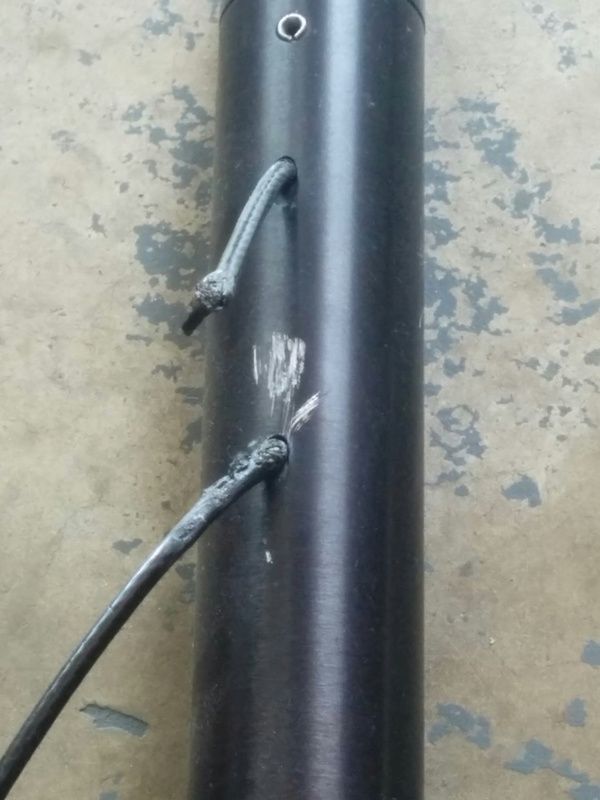
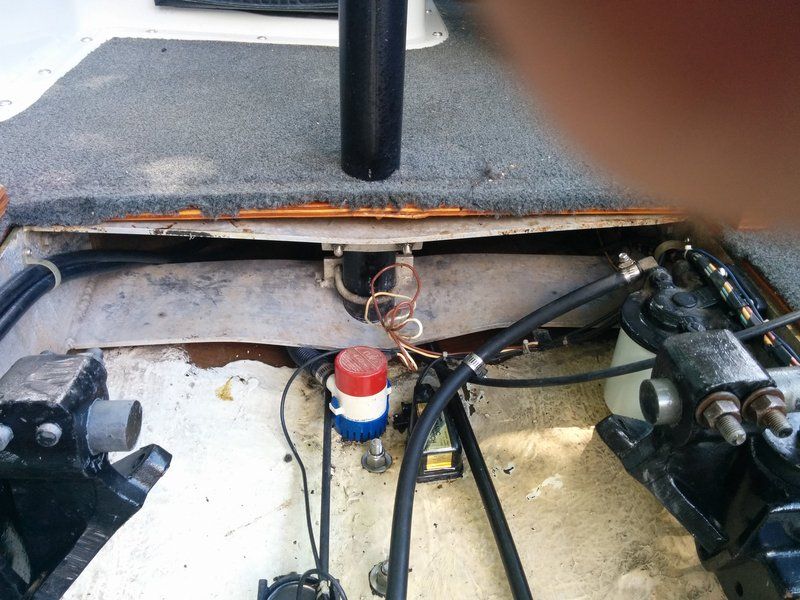
Even at idle speed when they hit the bridge, both extended pylon cables snapped and pushed the pylon backwards buckling the engine cradle as it pivoted right where it comes through the floor. I couldn't open the cover until I removed the boom clamp and Tachyon Super Delux Boom Mount. There isn't a lot of clearance between the pylon and the crank mounted RWP when the pylon is straight. This just added to that aspect. Neither the extended pylon nor the regular pylon was bent. Just the buckled cradle and snapped cables as well as a little scuffing on the extended pylon where it actually hit the bridge after the cables snapped. The pics don't really show the damage that great but it's definitely there.
John felt completely horrible thinking it was totally his fault. S**t happens sometimes and it was just an unfortunate accident with really no one person to fault. By far the most important thing is nobody was hurt. The boat can fixed. It was at least comforting to know that by the time we got home my wife said that she got a call from Swampy at WBC to thank us for the gesture of giving them the water. That's always a plus knowing that you helped someone out like that.
So now I have to figure out how to fix this thing. I know that the engine cradle has to be removed to repair it. This isn’t a CC with the cradle lag bolted to the stringers. That would be way too easy. American Skier through-bolts their cradles with 3/8” SS bolts, flat washers and nyloc nuts. The ONLY way to fix this is cutting up the carpet, drilling holes in my floor and digging out the floatation foam to get a wrench on the nuts from the backside of the stringers. A call to Ron also confirmed this. I can’t tell you how disconcerting that was for me and I had a really, really hard time justifying cutting up perfectly good carpet and coring holes in the floor.
First, a little history to explain my fears. I had replaced the floor, foam and carpet some 16 or 17 years ago. At the time, I didn’t have any idea how to do that. The internet was really still in its infancy. There was some manufacturer and business websites available but no forums like this one to help out. I had to do it the old fashioned way. Phone calls and reading. So I found Rot Doctor and called them. They were wonderful to talk to, extremely helpful and their products turned out to be awesome. Expensive but AWESOME!!!!!! My plan was to not just to replace the floor and foam but to treat it with CPES (Clear Penetrating Epoxy Sealer) and then completely seal the floor so it cannot ever leak and soak the foam again.
CC went to all composite construction in '93 and as such you see a premuim price tag on boats that are '93 and newer. You don’t have to replace the stringers (I didn't have to replace my stringers either) but it’s not completely maintenance free like everyone thinks. The way that CC builds their floors I absolutely insist that at some time, the floor will still delaminate and the foam will still get soaked which means that the floor has to be cut out and the foam removed and replaced.
I went through extra measures to seal the floor so no water could get at the foam. I used Rot Doctor epoxy putty to seal joints in the floor and the edge of the floor to the hull. I used an epoxy bedding compound on top of the stringers before I laid the floor down. After I had completely screwed the floor to the stringers, I removed each of them one at a time and squirted Rot Doctors CPES into the holes and then replaced the screw. Then I put three layers of glass over the top of everything. I swear you could have ten 200 lb. guys jumping up and down on my floor and it won't hurt it at all. Can you say the same about a CC's?
So now that I had to drill holes in my floor was I going to find wet foam and have to plan on redoing the floor and foam all over again?
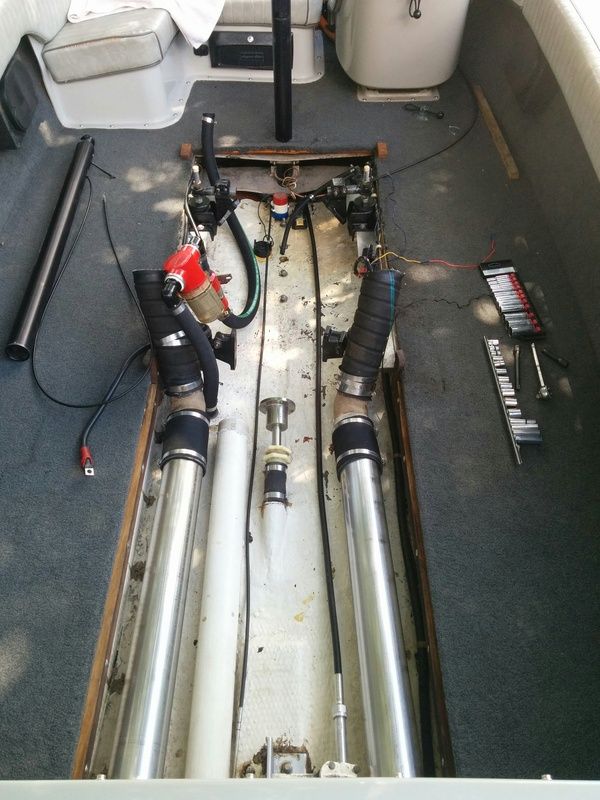
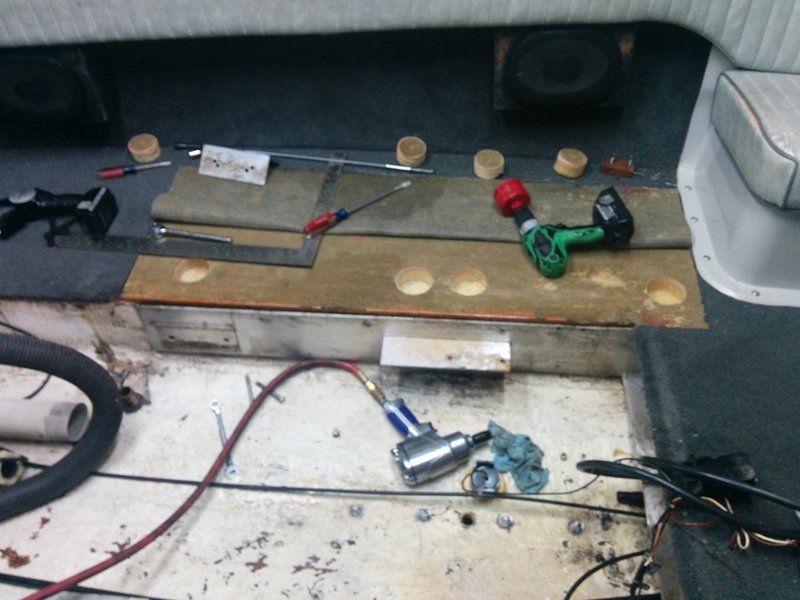
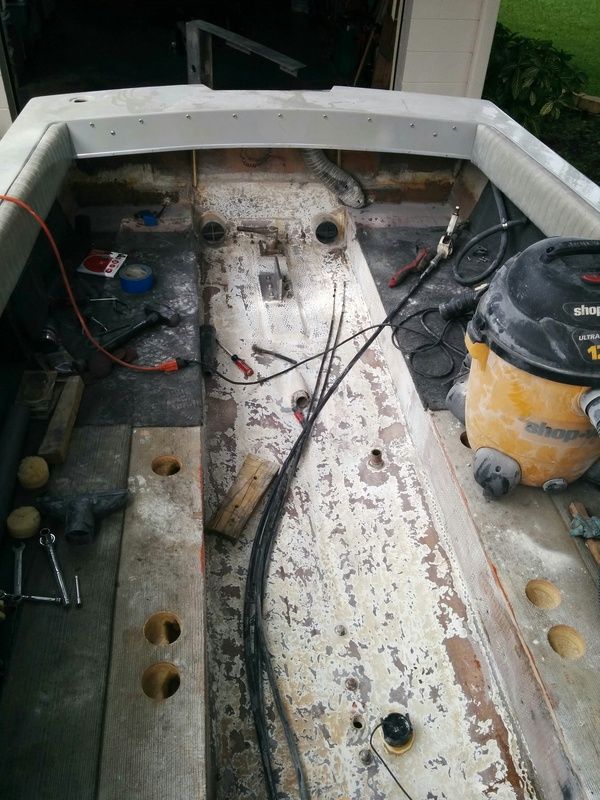
? Thus the extreme reluctance to do this. So, I kept putting it off kinda hoping that it would miraculously fix itself. Of course that didn’t happen. I finally started tearing into it in August (yeah, some six months after it happened). I removed the engine, cut the carpet, cored the floor, chiseled out the foam and removed the bolts. Removing the cradle was a PITA but the engine mounts were bolted on with the through-bolts so I cut a piece of 2x6 lumber and bolted it in place of the tranny mounts and beat the hell out of it with a 3lb. hammer. It came out but it took some doing.

So I get the foam cleaned out from the cored holes in the floor and.....No water. Everything is dry...THANK GOD!!!! As you can see by the pics the darker coloring is from the glass layup of the hull and stringers and not from water. Everything looked great after all these years. I was stoked.
I decided to refinish the bilge while I had everything apart. Something I probably should have done when I did the floor originally but didn’t know any better at the time. Then again when I rebuilt the engine a few years ago but I had too many other things that snowballed out of control…..like wetsanding and polishing the hull.
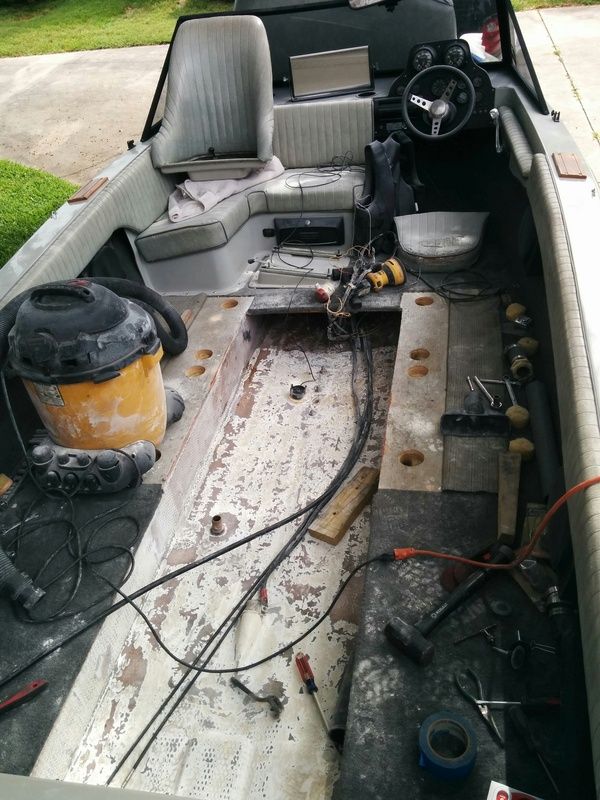
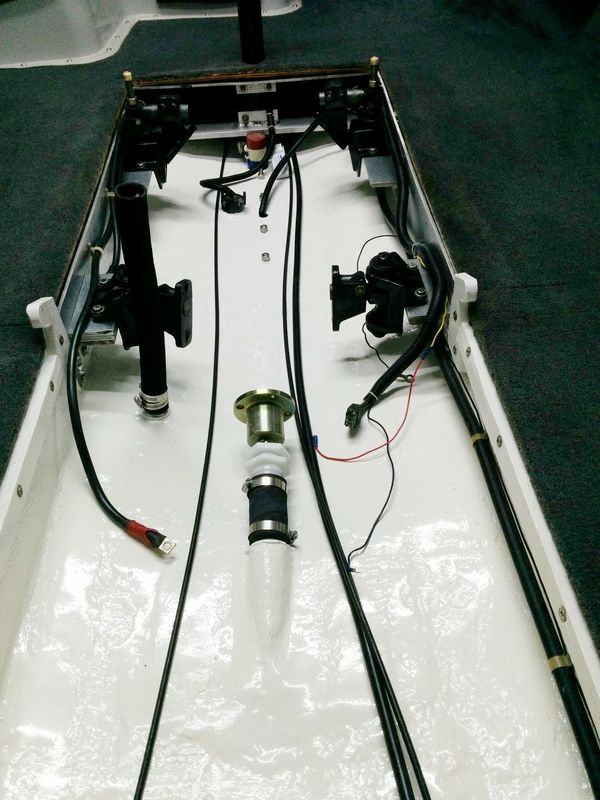
I removed everything except thru-hull hardware….cooling hoses, exhaust, propshaft, gas tank, fuel lines, wiring harness and the steering/throttle/shift cables.
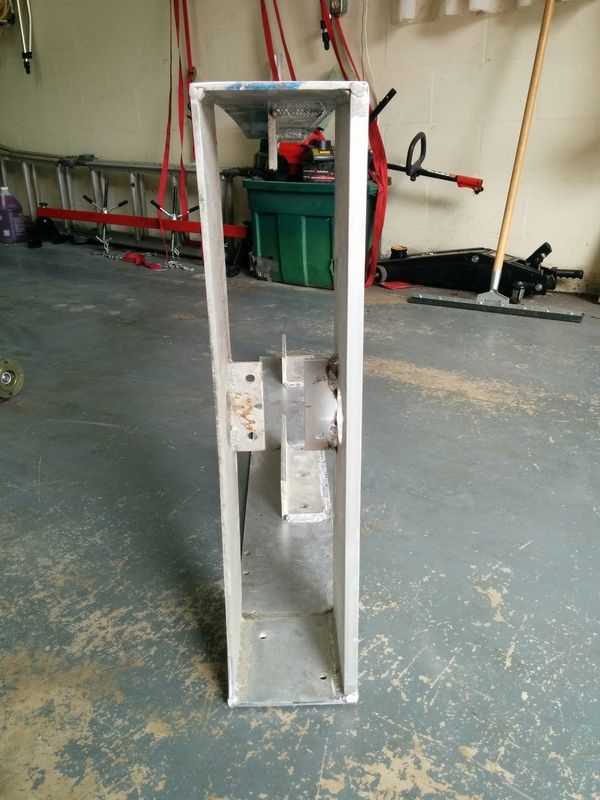
Now I had to get the cradle fixed. I did some checking around and found a local guy named Rob Bemman who had a machine shop that came highly recommended. That would be the same Rob Bemman who makes Bemman booms, pylons, jump ramps, trick releases and about anything else a water skier would use in, on and around a boat.
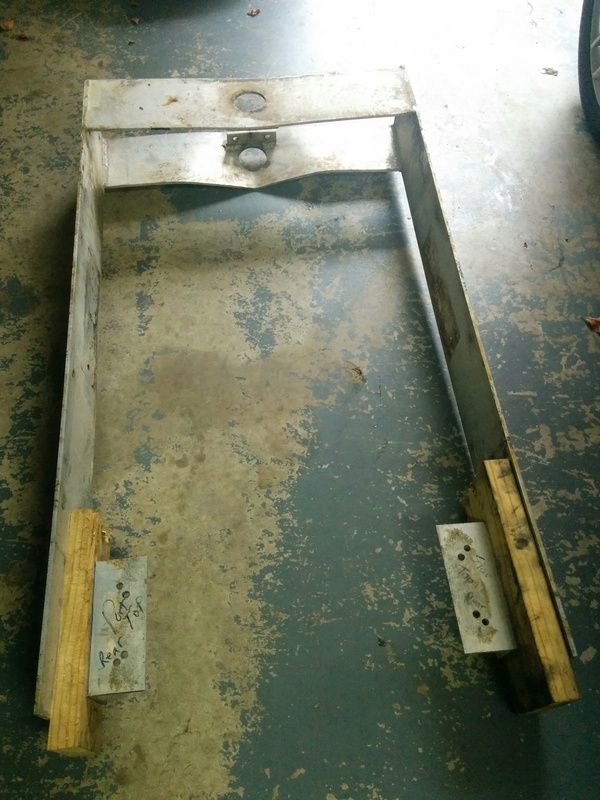
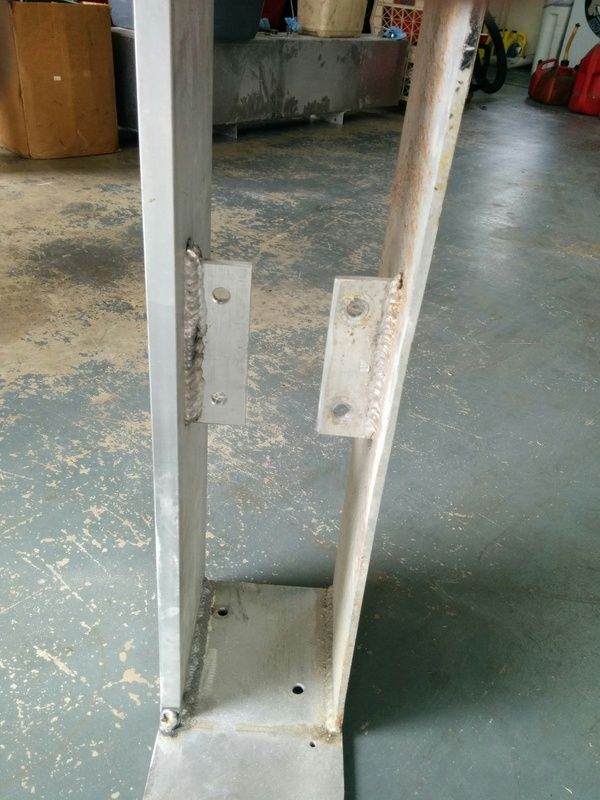
He did an amazing job repairing the cradle and replaced the extended pylon cables. I couldn’t be happier with the end result. He was able to repair the top piece of 1/4" flat stock which wasn't bent too bad. He removed the lower 1/4" flat piece of aluminum that was bent the worse and replaced with a 1/2" piece of flat stock. I also had him weld the motor mounts to the cradle which American Skier started doing sometime after '86 according to Ron.

I put the core plugs back in the floor and used Rot Doctor epoxy putty once again to seal them up. A little bit of rough sanding and a few new layers of glass over the core holes with Rot Doctor Epoxy resin.
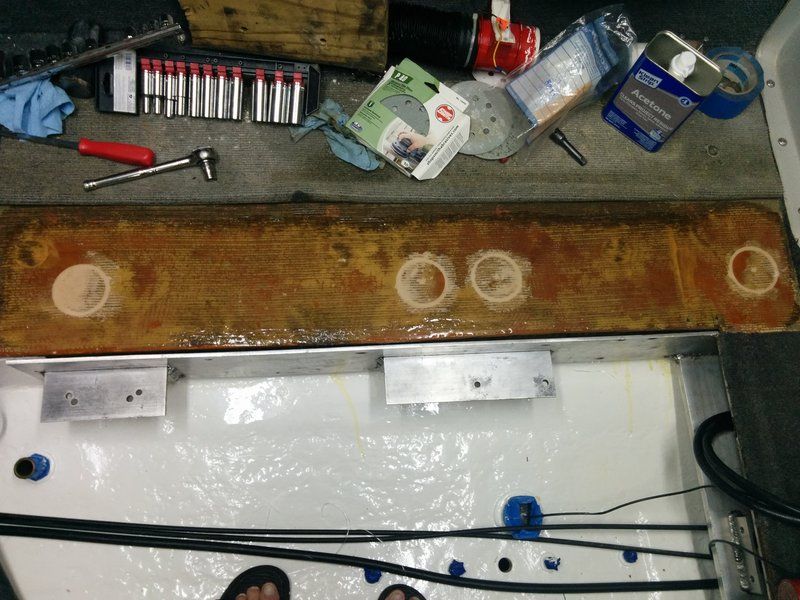
I got some Interlux Bilge Coat epoxy paint and painted the bilge before reinstalling the repaired cradle putting everything back together.

I purposely wanted to try and see how well I can get the carpet patched together vs. replacing it. I really didn't want to replace it.
These boats have the observer seat molded into the deck and then screwed to the floor. When the average Joe needs to replace the floor and carpet one way out would be to remove the upholstery and cut the seat back off inline with the bottom of the dash. After the repair then a piano hinge is used to screw it back together. The right way to do it is remove the entire deck keeping the observer seat intact, replace the floor/carpet as needed and then put the deck back on which is exactly the way I did it the first time so many years ago. Not hard but certainly time consuming. I wasn't going there this time around. Not when the carpet was in good shape yet so I can put up with a couple of slits in it until it comes time that it truly needs it. At least I would see how the bad it would ultimately turn out.
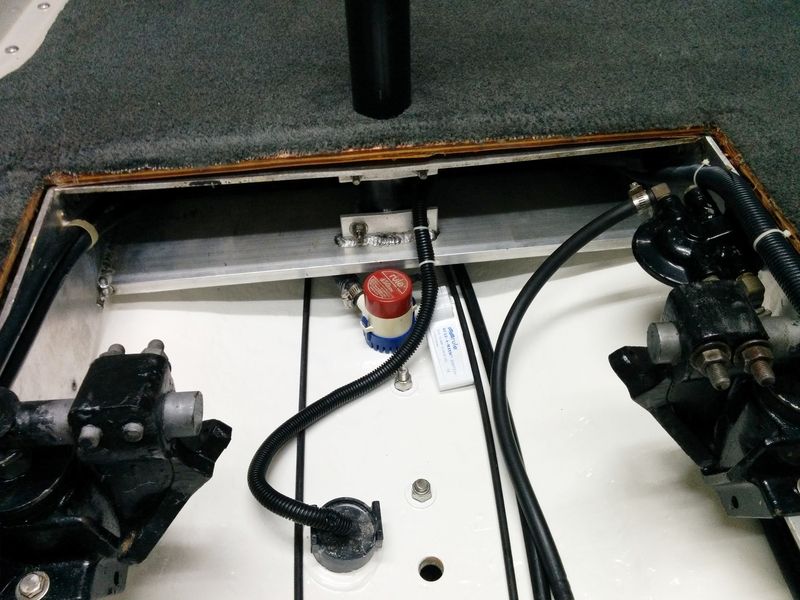
I had to tidy up a few other things. The bilge pump float bracket has been broken for a long time. I think the float was a mercury switch so I just replaced it. I dressed up all the wiring too.
I wanted to replace the shaft log hose which required that the plastic stuffing box be removed and repacked. When I removed it I found it was deformed (like an hour glass). The housing has a SS crush washer in it that prevents the housing from collapsing from the hose clamp. Unfortunately, the clamp was never installed over the crush washer so the reason for the deforming. I replaced that too with some fresh GFO packing.
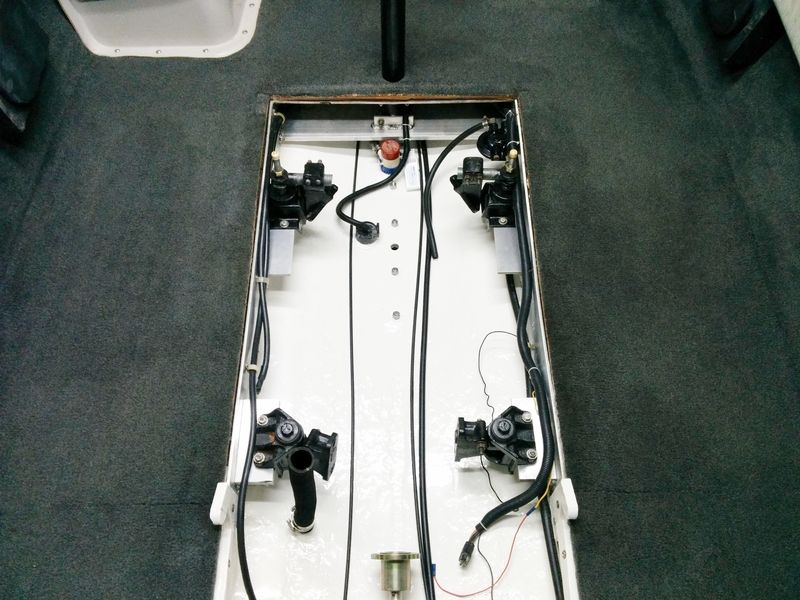
Look real close at the right rear tranny mount. Then compare it to the left side mount. You'll see that the left mount is thicker than the right. The factory added 3/8” aluminum flat stock on top of each mount. The left one has two spacers and the right side has only one. I have no idea how or why that happened. When I put the engine back in the left trunnion was aligned in the middle of the adjustment track and the right side had the trunnion pretty much pegged against the rubber bushing. It aligned perfectly fine that way but I wanted to make it right. So I called Rob Bemman again and he hooked me up with a perfectly cut piece of 3/8” flat stock aluminum to make both sides even. No pics of the end result but you get the idea.
The MSD marine dizzy cap has been redesigned and is no longer available in the old socket configuration. You can only get it with HEI type male terminals so I had to replace the spark plug terminals on the dizzy end. I made the spark plug wires when I installed the ignition years ago so replacing the terminals was pretty easy. Especially with the engine on an engine stand.

I got the engine back in and aligned. All the wiring, hoses and cables were reattached. I also removed, cleaned and lubricated the Morse control. Then I was to the point that all I had to do was get the prop and exhaust put back on and I was pretty much done. I got a new SS prop nut to put on. My old brass Nyloc prop nut was still the original one since I've owned the boat and definitely worn so I wanted to replace it. Not sure why I didn't get another brass one.
The end couple of threads on my prop shaft were scarfed up a little bit. I probably scraped it on the floor at some point but that's irrelevant. Being SS being spun on SS, I was thinking I should probably put a little anti-seize on the threads but nooooooooooooooooo, not this dumb ass looking to finish things up and cutting corners. I cleaned the threads up a little bit with a jewelers file and spun on the new nut. I got a few turns and the nut galled and seized up permanently. It doesn't budge!!!!!
After I got done kicking myself in the ass numerous times and swearing like a sailor at sea, I came to my senses and looked at the big picture….
My choices are to remove the rudder to get an impact on the nut (which still doesn't guaranty it coming off) or remove the rudder and the shaft (which still doesn't guaranty the nut will come off) or just cut the shaft and replace it with a new one. OK, this officially sucks now!!!!
So I take the rudder out which turns out to be a whole new bag of s**t. The rudder never leaked and it turned smooth as silk by hand. I just put a couple shots of grease in it every couple years since I've owned it.
I removed the cotter pin, the tiller arm and tiller arm key and expected it to drop right out. No such luck. I got it to drop about an inch and then it seized. I lifted it and hammered it back down on it's own weight again….and again…..and again. It didn't finally release until that last 1/4” of the port and I was into it for at least an hour or more. Evidently, the tiller arm pinch bolt was drilled through the rudder shaft after it was installed in the boat which expanded the shaft enough to make it seize in the port.
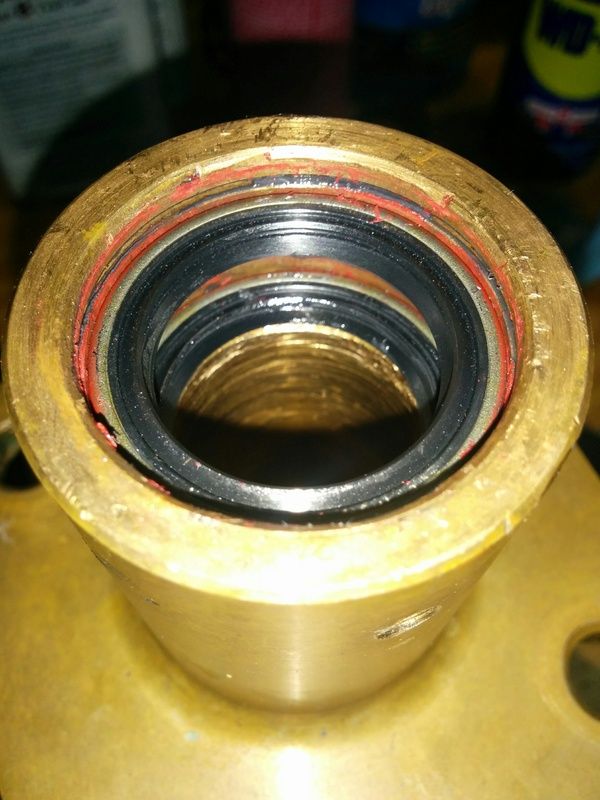
This is before removal.

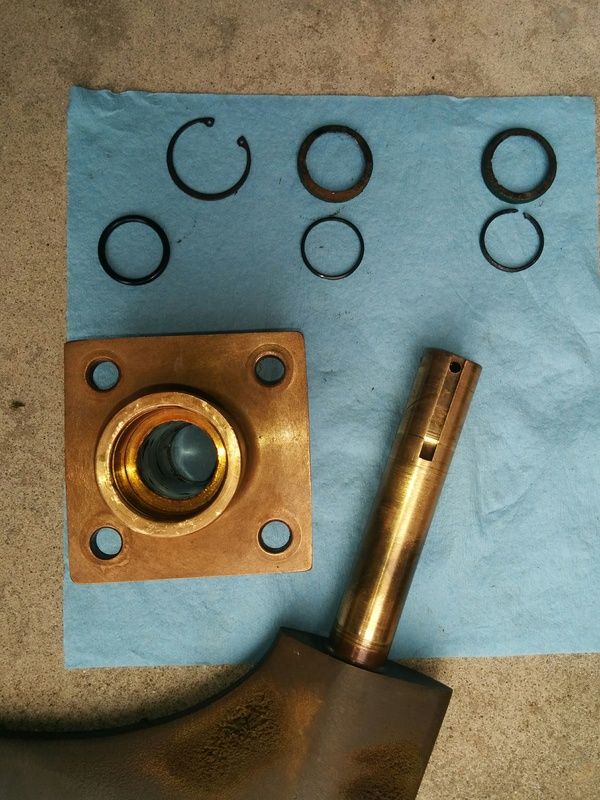
When I started cleaning up the rudder port, I found out there are two grease seals and an O-Ring in the port that need to be removed and replaced. All three were completely destroyed removing the rudder. I removed the upper most grease seal (and snap ring) and the O-Ring without problems. But then realized that there was another grease seal much lower in the port. There was no way I would get that seal out without either removing the gas tank (again) or removing the rudder port so I pulled the port. The rudder shaft and port were so tight I knew that I would never be able to get them back together. So, with rudder and port in hand, I made another trip back to Rob Bemman. He got everything to fit like it's supposed to. Then a call to Ron Tanis and two seals and an O-Ring were on the way.
This is everything that came out. Or rather the pieces of everything that came out.
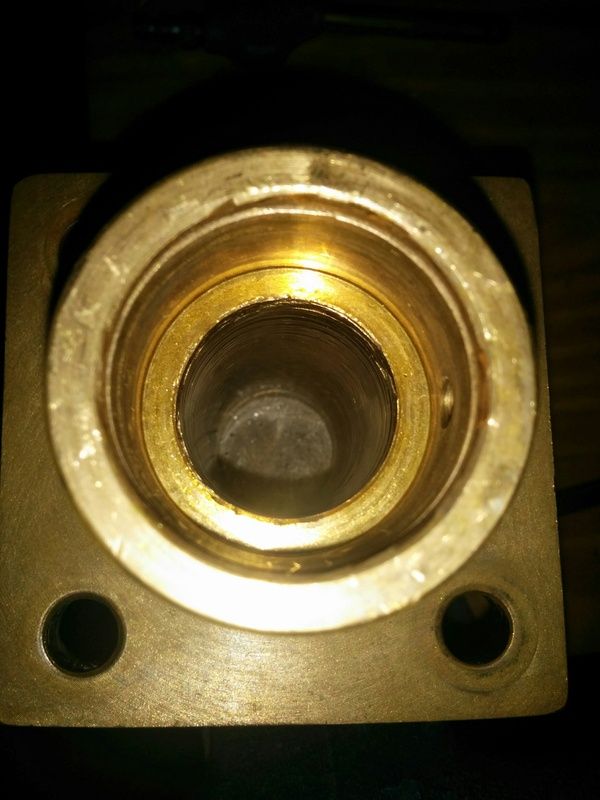
This is the cleaned up port. You can see how scarfed up it got (the smaller diameter part of the port) trying to remove the rudder. Fortunately, the rudder shaft doesn’t actually contact that wall if it’s sized properly. The shaft should be centered with the new seals and O-Ring.
The first new seal installed

The second new seal. There's still a snap ring that goes into a groove just above this seal.
New O-Ring installed in the base of the port

As a side note, Rob Bemman's work has been absolute perfection for whatever I asked him to do. Everything he makes (booms, extended pylons, jumps, trick releases, etc.) are all skier developed and outstanding quality. I'm impressed and would highly recommend giving his products consideration if you're in the market.
Then as far as Ron Tanis goes, he and I have had very lengthy discussions at different times over the last several years. As a former AmSkier dealer, employee and owner of the company he's forgotten more about these boats then I'll ever know. I can't thank him enough for his help on numerous occasions.
So onto the prop shaft and the reason this whole thing snowballed out of control in the first place. I had the shaft and threads soaking in an Acetone/ATF mix for about four days while I looked for answers on the rudder and rudder port. I don't have access to a torch so I knew I was screwed in that regard. With the impact, I could unscrew the nut maybe a 1/16 turn and then tighten it maybe a 1/8 turn. Then back it off some more and tighten it up while constantly hitting it with more of the ATF mix. It finally came off but not without a fight and really messing up a few threads. As long as I can get the nut all the way up to the prop itself, it'll be on perfectly good threads. I just need to be able to get it past the bad threads first.
So I start an online search for a thread chaser and I find this…..
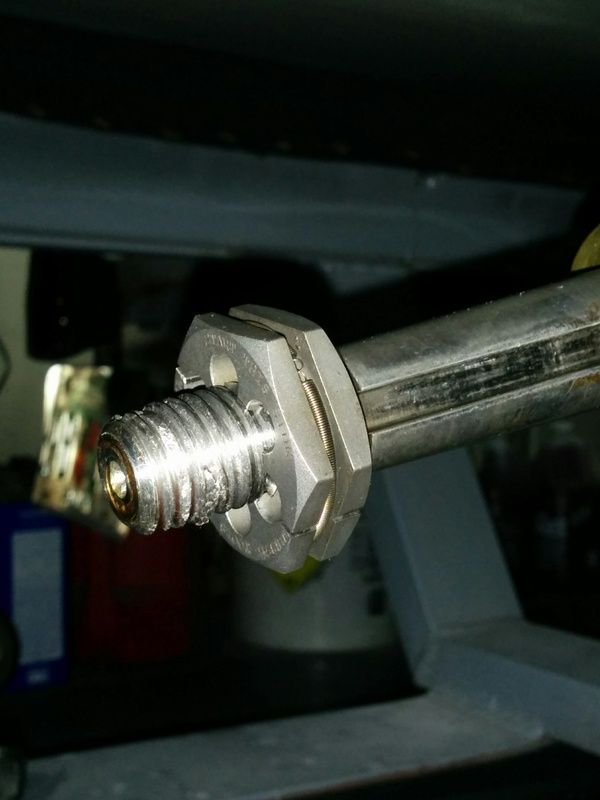
It's a two piece unit wrapped with a spring that holds the two halves together. You pull it apart and put it above the damaged threads. Then you take a six point socket and turn it backerds off the shaft. It's pricey compared to standard thread chasers but pretty much guaranty you can't possibly get any cross threading. A cool concept that I haven't seen before. Way cheaper than a new shaft. Then the next problem is finding a big enough six point socket (1 1/2”). Yeah…..it's a big sucker.
I acquired the chaser and the socket and slobbered the threads with anti-seize and it cleaned everything off really nice. There are parts of the threads that are missing but a nut spins on real nice with a little anti-seize for good measure.
The moral of the story here Boys and Girls is make sure that you clean up damaged threads before you run into problems like I did. Rest assured, I'll also be using a little anti-seize before spinning a prop nut on again just because.
Here is a new brass nut nice and snug. If you look close you can see a missing thread between the nut and the cotter pin.

So I got the rudder port and rudder reinstalled. Everything works smooth as silk. I just have to wait til the water test to verify it really doesn't leak at all. At this point I literally have to put the exhaust back in and I can fire this thing back up and test it out. Then I need to get the new extended pylon cables terminated and adjusted properly. Hopefully this whole snawballing mess will offiicially come to a close.
I just had an outpatient surgery so I can't quite finish it up yet. I really am getting close though until any other unforeseen snowballs come flying my way. I'll keep you guys posted. All you northern guys have nothing else happening for a few months yet anyhow so you can chill (literally) and enjoy the struggles with someone elses boat for a change.

